Showing posts with label project. Show all posts

February 04, 2014

Lesson 172: Cars (& Trucks & Things That Go) Decor

Welcome back to 2-year-old birthday party land! Today's agenda, a few more Richard Scarry themed decorations.

If you missed yesterday's post, check out Hudson's birthday banner here!

If you are interested in finding appropriately themed activities click here!

Creature Cupcake Toppers:

After making the Scarry themed bunting, I had some funny pictures leftover. I simply glued these silly creatures to construction paper, which increased their durability. I then taped toothpicks to the back and voile, cupcake toppers that set the tone for a magical and musical party!


Playful Produce Cars:

Richard Scarry is famous for his carrot cars, cheese cars, pickle cars, apple cars, and the fun, appropriately themed creatures responsible for driving them. In a Scarry world, anything can be turned into a car.

Taking a page out of his book, we attempted to make our own playful produce cars.


The wheels and drivers are from a duplo set. The produce is from, well, the grocery store. I simply cut out a square on the top of the various pieces of produce large enough to wedge the driver in.

Super simple!

In fact, writing this blog post took significantly longer than completing these projects!

Stay tuned for a few, simple CARS and TRUCKS and THINGS THAT GO activities, appropriate for children age 2-5.


Lesson Learned: When it comes to party decorations, perfection is not necessary. Creativity is. 


February 03, 2014

Lesson 171: Simple Book Birthday Bunting

Hudson is obsessed with Richard Scarry's book, CARS and TRUCKS and THINGS THAT GO. In the morning for at least an hour, he and I will peruse its 60-some pages gasping over every single bulldozer and dump truck and CAR!!! The experience is exceptionally exciting, every time through. 

Thus, Hudson's 2nd birthday party was "CARS and TRUCKS and THINGS THAT GO."

All week long, I'll be sharing various details from the party, with simpistic tutorials and lots of pictures! I get overwhelmed by long party posts, so these will be concise and pointed. 

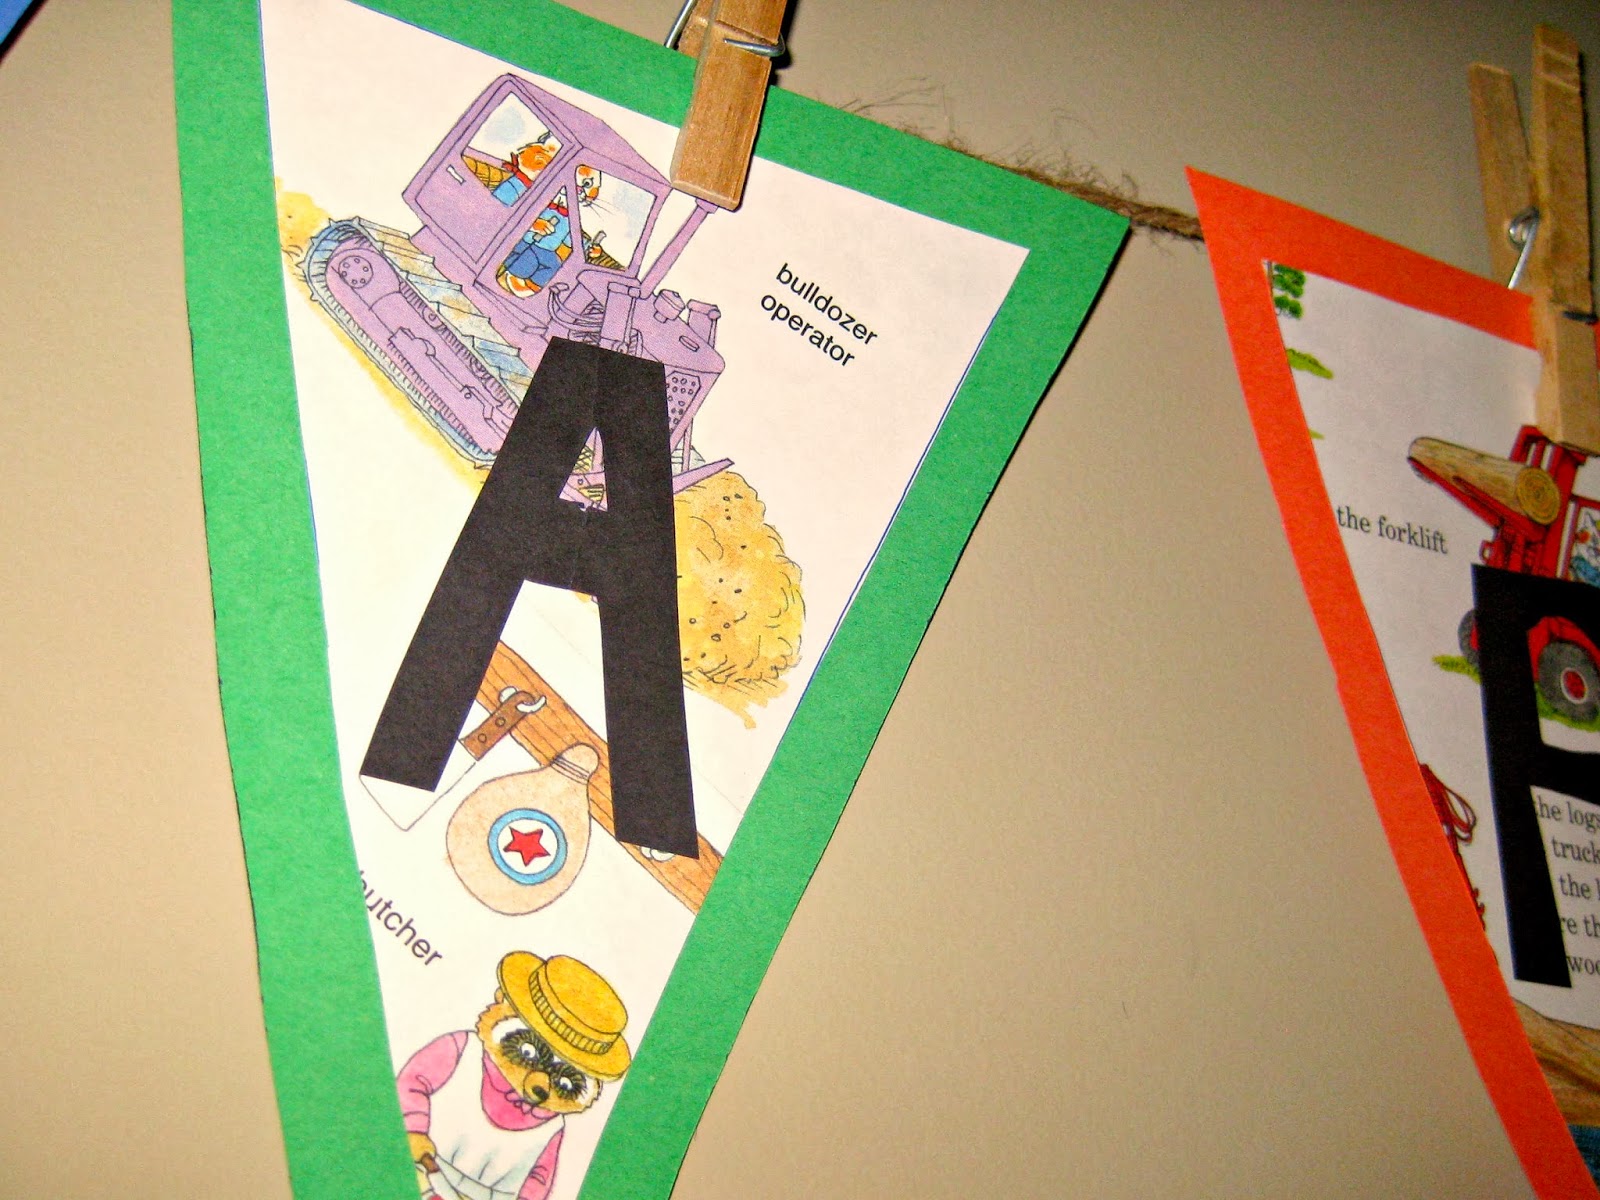
To begin, A Simple Book Bunting. This could easily be used for a birthday party or a baby shower. (I am not claiming originality here with the bunting. But I do think it is cute.)

I went scouring my local Goodwill, for surprise, surprise, a Richard Scarry book to cut up. I scored big time, with a small generic one (courtesy of Chik-filet) and purchased it for .99.

Also necessary, a pad of colored construction paper for $2 from Target and $1 clothespins from the Dollar tree. We already owned the twine. 

Total Cost for supplies: $3.99.


First, I made a generic pattern for the base of bunting. 

Unintentionally, though fortunately, I was able to fit three triangles per piece of paper. 

After cutting out enough, I made a smaller, similar pattern for the inside that I used with the pages from the Scarry book. Though not all pages featured vehicles, I did my best to choose pictures that did. I also made sure the pictures were not the same color as the background triangle.


Black construction paper for the letters popped nicely against the playful pictures.

I made a second line that hung on my mantle and featured Hudson's name and new age. 

When he saw the pictures of his favorite vehicles hanging on the wall, Hudson knew something special was in store! The shrieking and pointing and gasping and smiling were clear signs that the bunting was a hit!


Lesson Learned: Little boys love trucks. And if you embrace this fact, they will love you too!


December 31, 2013

Lesson 155: An Anniversary Gift in the Wood

Mark and I have never exchanged anniversary gifts.

First of all, our date falls just five days after Christmas. Who can keep a surprise that long? Not me. Everything is unwrapped and exposed on Dec. 25.

Second, until this year, we've had zero disposable income come anniversary time. Then, you have to pay for dinner, and a movie, and a baby-sitter. Who can afford to also celebrate with a gift?

In Mark's defense, he tried to order me something special this year. He knew I was in search of the perfect button down white collared shirt. He thought he had hit the jackpot with a simple one from Banana Republic, but when it arrived ... well, let's just say the bedazzling on the collar didn't impress either of us.

This year was no different. We celebrated year five yesterday, and no presents were presented. No feelings were hurt.

However, for the fun of it, we googled what the appropriate gift category is for a five year anniversary and found out it is wood.

Perfect!

You see, we had already planned on a little backyard adventuring turned treasure hunt for the day. And look what we found.


Well now. That's a lot of wood. Our creative wheels are turning. (Are yours?)

Perhaps year five will involve a wooden anniversary gift afterall.


Lesson Learned: Adventure awaits right outside your door. Or at least, our door.


November 07, 2013

Lesson 134: Let the Filling Begin

Remember my empty hallway? (I got so much interaction with this post.)

Work on it has commenced.


Poor dead ladybug ...

My mom's friend graciously donated this piece of furniture to the Ashbaugh's. Us. It made the long trek from PA to SC in August, and just last week, underwent a slight color change.

With a coupon from House Beautiful, the paint was free at Lowe's. I was super lazy with the project. I think Valspar covers nicely, so I sanded a bit, used no primer, and only painted one coat.

I considered keeping the two-toned thing going, appreciating its subtle nuancing. However, in the end, the nuancing drove me crazy, and I painted it all one color.

Still on the look-out for knobs.

Stay tuned to see its incorporation into the hallway!


Lesson Learned: Don't go swimming in paint, ladybugs. You will die!


October 23, 2013

Lesson 123: A Wagon Project

Thank you so much to all who weighed in on what we should do with our "Surprise in the Woods." If you can believe it, Mark and I had not even considered turning the wagon into a coffee table.

If you missed last week's post, we found this in the woods near our house.


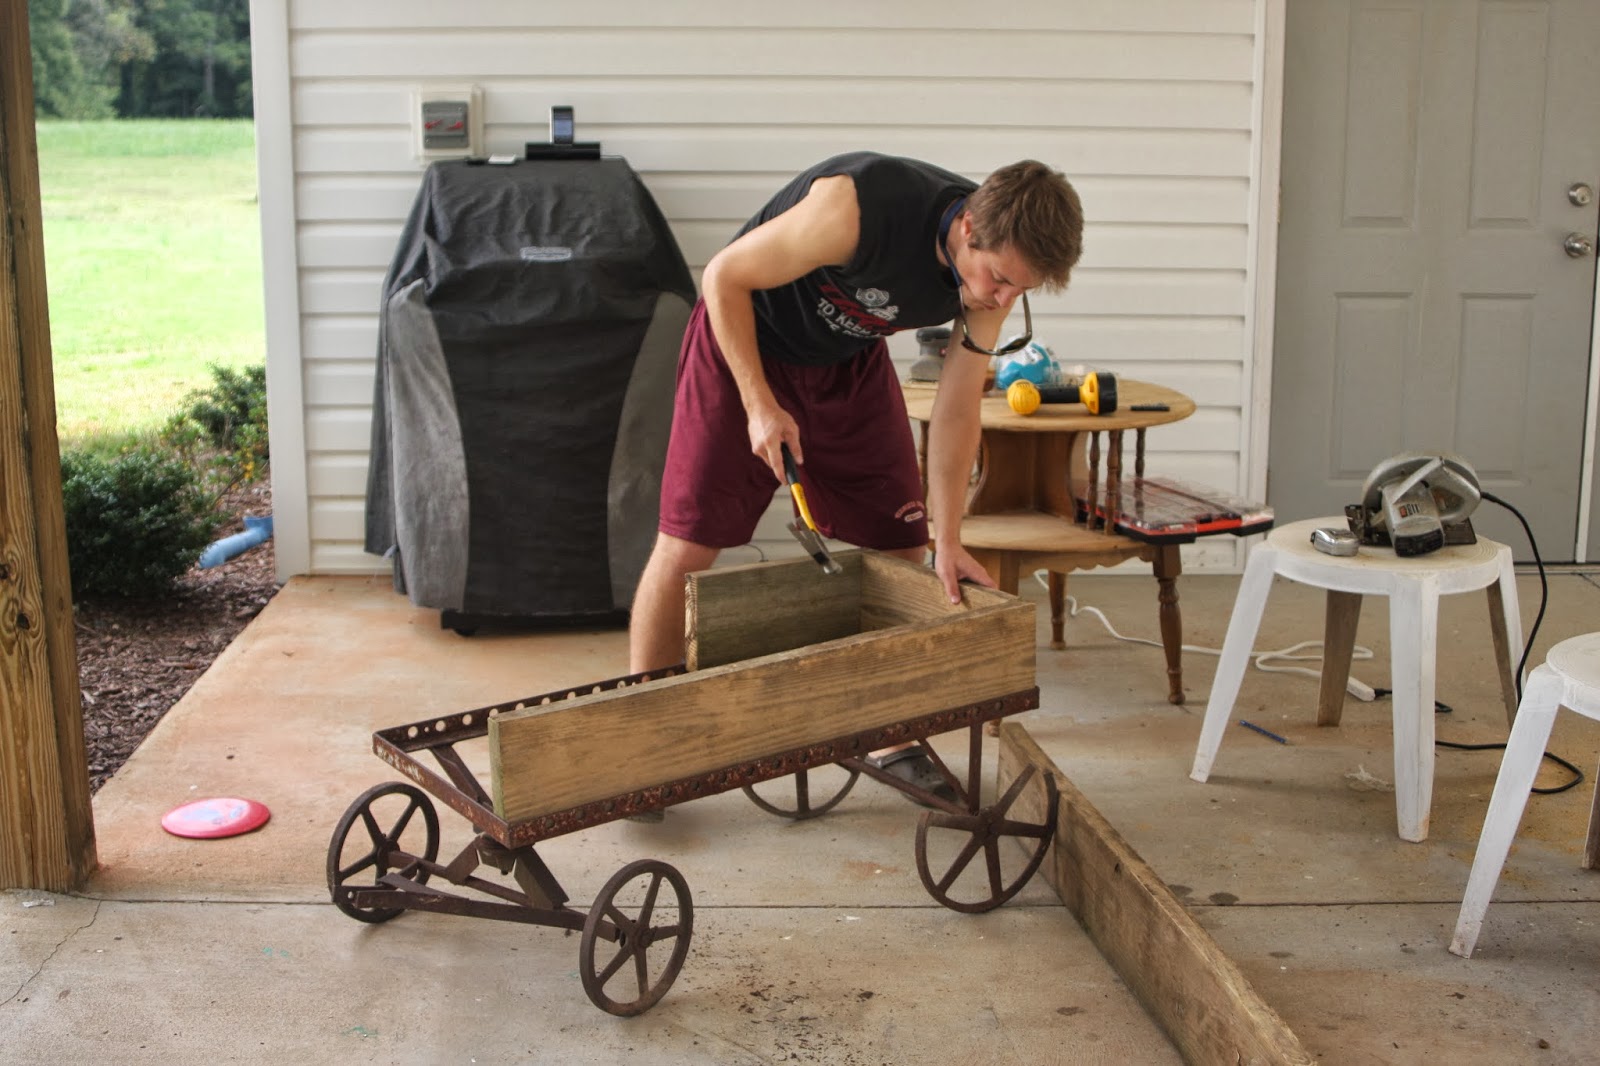
Mark has been excited to his get his hands on it for a while. Last Saturday morning, he woke up with the desire to do man things (said in a deep voice).

Real men saw, drill, build. Grrrr.

He worked hard all day (in a tank top).


Using scrap wood from the property, he created this.


He and his assistant filled it on up with dirt and doodoo!


And planted some seeds. "It's CLO," he informed me. (Carrots / Lettuce / Onions.)

Real men use acronyms as memory clues.


I doubted his gardening ability much less this time around.  Good thing, because I would have eaten my words. One week later ...

Oh, hello lettuce sprouts! We cannot wait to eat you.

Real men eat vegetables.


For now the wagon is home to our fall garden. Come spring, I hope to fill it with flowers and herbs, perhaps beautifying the slab of concrete on the side of our house that welcomes visitors to the back door.

We really do love the idea of turning it into a coffee table in the future. One of the wheels has a super sharp edge on it, so we aren't quite ready to bring it into the house with unsteady feet running around the place. However, it's not like spending a little time outside for now is going to ruin the thing.

We did find it in the woods afterall.


Lesson Learned: I married a real man! A man who builds ... and gardens. He's awesome!


October 17, 2013

Lesson 119: A Surprise in the Woods

If you found one of these in the brush by your house, what would you do with it?


No, I am not thinking the dumpster.

I'll keep you updated on the Ashbaugh answer. (See the post here.)


Lesson Learned: One man's trash is another man's treasure.


August 24, 2012

Lesson 37: Pinterest in Print (Back to School Series)

In the spirit of "Back to School", I have purged my closets. Bags of unworn clothes and dusty home items are in the car headed to Goodwill. After multiple moves and numerous spurts of redecorating, I don't have a huge emotional attachment to unused things anymore. I'm so happy to get them out the door!

But, there is one thing that I have a really difficult time just throwing away. Magazines.

I love magazines! I love looking and relooking at them! I also like having them available for guests to look at, because guests love looking at them!

Unfortunately, in my "Back to School" cleansing, I realized that my magazine hoarding had become a problem.


June 23, 2012

Lesson 17: For All You Non-Sewers Out There

Here in Clover it seems as if everyone knows how to sew. Even the boys know how to sew. Their moms are monogramming, seam-stitching wizards, and they make it their business to see to it that everyone has at least the know-how to reattach a button.

I do not know how to sew. I cannot correctly reattach a button. I use safety pins.

It really is kind of pathetic. My own mother was a smocking genius back in the day. I appreciate her talents now, because she managed to save the boxes and boxes of beautiful smocked dresses she made for me. Samara plays the part of a sweet Southern girl every Sunday morning, and I'm spared the cost of it. Thank you mom.

Unfortunately, sewing skills are not genetic. Just because a person spends the majority her single digit years in homemade clothes, does not in any way indicate that she will one day be master of the machine as well.

For a while I lamented my inadequacy. I've even considered taking action to remedy it. Last week my neighbor went to sewing camp. What a great idea I thought! I could definitely learn something useful with a whole week of practice.

Turns out sewing camp is only for elementary school children.

Occasionally, I lie awake at night wondering how I will ever make Samara the fairy princess gown that she desires for Halloween or Hudson the dignified Robert E. Lee uniform for a school play. My Christopher Columbus get-up was phenomenal! Man my mom was good. How am I going to be even an ok momma if my drawer of lost buttons only continues to fill up?

My friends, I have found a solution.

It is called Heat'n Bond Iron-On Adhesive. It is miraculous for three reasons.

1. HBIOA is so simple. The adhesive comes you a roll. You simple rip a piece off that is the correct size. You place it between the layers of fabric that you want connected. Then you press down with your iron for 3 seconds. You may have a repeat the iron part a few times.

2. HBIOA is so fast. Do you really mean 3 seconds Katherine? Yes, I really mean 3 seconds.

3. HBIOA is so inexpensive. A roll at Wal-Mart costs less than $2, and it looks as if it will last me for a while.

Though I agree that there is no substitute for real, honest sewing knowledge, this product really is a life-saver for those of you out there, like me, who want to complete the projects, but do not have the time for lessons or the money to invest in a good machine.

Mark and I are currently in the process of constructing a Dress-Up center for Samara's birthday. Something kind of like this.

                                                   http://www.brooklynlimestone.com/2012/02/conquered-closet-chloes-dress-up.html#.T-ZqPZHhfNr
 
However, I wanted Samara's to have a curtain to cover all the fun dress-up contents creating a magical world for her within. I also don't love looking at clutter.

How does one make a curtain without using a sewing machine? That's right, with a little something I like to call HBIOA.

Not the worst right?


I am considering asking for help with a monogram. I don't know if something generic would have the same cuteness level. Then again, I'm pretty sure there are iron on letters out there. Hmmm ...

If only I could iron on a button.

Lesson Learned: With a roll of HBIOA and an iron, you too can create the fabric projects of your dreams.


June 19, 2012

Lesson 16: My Entrance to Pinterest

I entered the world of Pinterest last summer as finals were ending. My friends at school were raving about this website that gave them all sorts of creative ways to use pallets in home decor. I was intrigued.

After a few days of obsessive pinning, I sort of got over the craze of the site and began to only use it for practical purposes.

And I will say, it has been helpful. For example, I pinned this ...


 ... and then accomplished this.

However, recently, pinterest has let me down.

Last week Jenni and I threw a baby shower for our friend, Teresa. This is Teresa's second baby (born today: congratulations) since we've all been in seminary. Hence, we have already thrown her a shower. The last one was crazy! Husbands and kids were invited so there were people everywhere, the menu was burgers with every topping and corn on the cob, and activities included a huge game of soccer. 

We decided to take a different approach this time. Just girls, no kids, beautiful, classy, calm, sweet. We used Jenni's monogrammed silver and her new dessert china. We subtly leaned towards boy colors. (We were right!)


For a gift, we asked Teresa what she really needed and collected money to buy her the one big thing. Turned out her biggest need was new cloth diapers. Yes, my friends, she is a cloth diaper kind of girl! They worked with the first and so she's sticking with them with the second.

She registered for seven little green diapers. They really are the cutest things ever. However, it's kind of a weird shower if the momma-to-be only gets one present and she already knows what it is.


Thus, I consulted pinterest because I just knew the site would have some ridiculously adorable, creative idea for turning my seven lame diapers into a baby shower sensation.

Boy was I wrong! It was so predictable! There were diaper cakes all over the place and a few diaper wreaths. The only original ideas I saw were a little baby carriage, a tricycle, and a baby all made out of diapers. However, all were constructed using throwaways rather than cloth.

Distraught, I enlisted the help of some very creative friends here in Clover. Real flesh and blood people. Our mission was to turn seven cloth diapers in some unified cute creature that also highlighted the fact that it was made of diapers.

After humming and hawing, a bit of frowning and backtracking ... a light bulb went off ... A CATERPILLAR!

How cute is he?!?!?!

I wish I could give you the play by play of how to make one yourself. I realize that's the standard for a successful post. Unfortunately, I did more of the suggestion making rather than the actual making of him. I can tell you a few things though.

1. Shirley ran one piece of fabric through the whole thing to connect them all. 
2. She stuffed the diapers with tissue paper.
3. She used rubber bands to tie various things together ... no pins! You do not want to pick the diapers.
4. The little legs are made out of washcloths and are connected through the diaper legs with pipe cleaners.
5. The feet are baby socks.
6. The eyes are also socks. (I made those.)
7. The tail is little mittens used to keep baby from scratching himself.
8. The antennas are pipe cleaners.
9. She also used glue dots when needed. They work great and do not leave marks.

Other than that you are on your own!

You may be wondering why this post is entitled "My Entrance to pinterest." You may be thinking, "Katherine, you are already on pinterest. How could this be your entrance?"

I have an ulterior motive for posting about this cool caterpillar. The second we thought up the idea, I began dancing around the room saying, "I'm going viral on pinterest. I'm going viral on pinterest."

You see, since starting this blog, I've done some research on how to increase blog viewership. One of the main ways is to have an image or post get circulated around pinterest. Unfortunately, my blog is almost entirely writing. People do not pin and repin long passages of writing.

Ahh, but then came the caterpillar!

Baby shower hosts all over the world need to know that green cloth diapers can become a friendly, little guy like this one, and you are just the people to tell them. If you agree with me that this guy is super cute ... you know what to do!

Lesson Learned: Online creativity is no substitute for real life creativity!

Lesson to be Learned: I would like to add the pin it button to the blog, so if you know how to do that, please let me know! Here's really simple directions to doing it!


Related Posts Plugin for WordPress, Blogger...